Weasley Location Clock Project
I wanted to surprise my wife for Christmas. She is a redheaded Harry Potter fan and mom, which inspired the idea to build a Weasley Clock. I got the idea in February, so I had 10 months to get the project designed and built.
For those unfamiliar with Harry Potter and the Weasley Family, the Weasley wizard family owns a magical clock that instead of telling time shows the location of each family member with a separate hand. Here's an excerpt from Harry Potter and the Goblet of Fire (J. K. Rowling, 2000):
Mrs. Weasley glanced at the grandfather clock in the corner. Harry liked this clock. It was completely useless if you wanted to know the time, but otherwise very informative. It had nine golden hands, and each of them was engraved with one of the Weasley family’s names. There were no numerals around the face, but descriptions of where each family member might be. “Home,” “school,” and “work” were there, but there was also “traveling,” “lost,” “hospital,” “prison,” and, in the position where the number twelve would be on a normal clock, “mortal peril.” Eight of the hands were currently pointing to the “home” position, but Mr. Weasley’s, which was the longest, was still pointing to “work.”
. . .
“Oh your father’s coming!” she said suddenly, looking up at the clock again. Mr. Weasley’s hand had suddenly spun from “work” to “traveling”; a second later it had shuddered to a halt on “home” with the others, and they heard him calling from the kitchen.
. . .
“Oh your father’s coming!” she said suddenly, looking up at the clock again. Mr. Weasley’s hand had suddenly spun from “work” to “traveling”; a second later it had shuddered to a halt on “home” with the others, and they heard him calling from the kitchen.
Turning this "magic" clock into a reality required research. While I have plenty of experience programming, I only recently started writing code that moves things in the physical world. In 2018, I started mentoring my local FRC FIRST Robotics club, which introduced me to the world of motors and encoders.
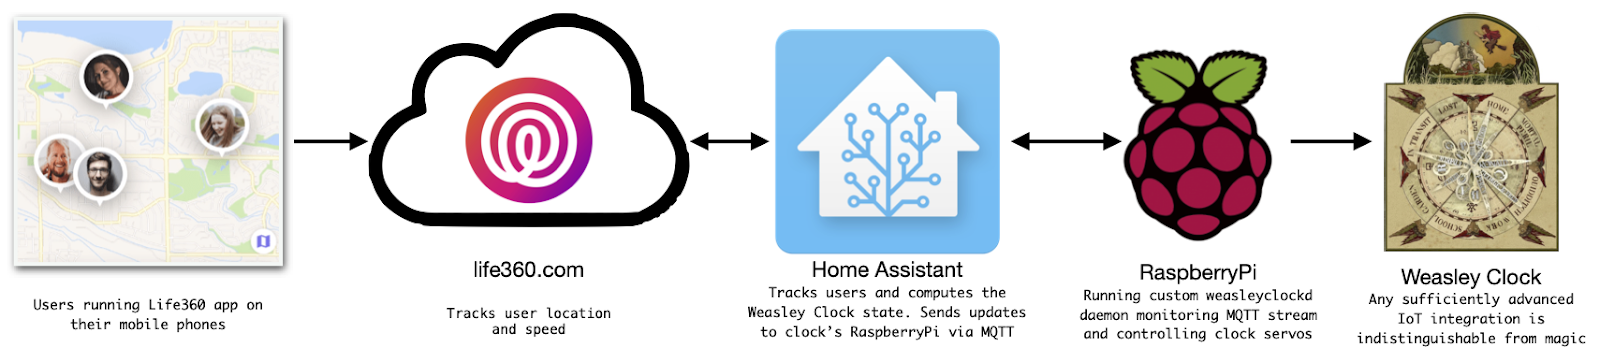 |
| Flow diagram of how the Weasley Clock is updated. |
I broke the clock project into workable sub-projects starting with location tracking. Initially I used Apple's Find My application because my immediate family is all on iPhones. I switched to using Life360 because their API is more friendly to 3rd party use and this allowed the inclusion of my in-laws, who all use Android phones and with whom we share a home. Before I even started building and writing code, I had to convince the whole family to install and use Life360. To my relief, everyone agreed. My wife signed on for the safety benefits, totally oblivious to my ulterior motive to create an elaborate Christmas surprise for her.
The next challenge was creating a multi-hand clock. I naively thought these things already existed and I would just need to buy one and hack some custom motor controllers. I settled on using nested brass tubes available from hobby stores. I attached the gears to the brass tubes using clamping hubs from ServoCity.com.
I decided to use servos for moving the hands and found multi-turn "sail winch" servos. I bought and soldered together an Adafruit 16-channel Raspberry Pi Servo HAT and started prototyping. About this time I started to get really excited because I knew it was all going to work.
Next I needed software to convert the raw location data and turn it into the states for the Weasley clock. I opted to leverage my existing Home Assistant installation to act as a broker for the Life360 location data and calculate the clock state. This made the system more complicated overall, but allowed me to offload the Life360 integration (and any potential future API changes) to Home Assistant. I also track which Wi-Fi access point people are connected to. This allows for finer grain tracking around the house. For instance, when someone’s phone connects to the outdoor access point, the system knows they're in the Garden.
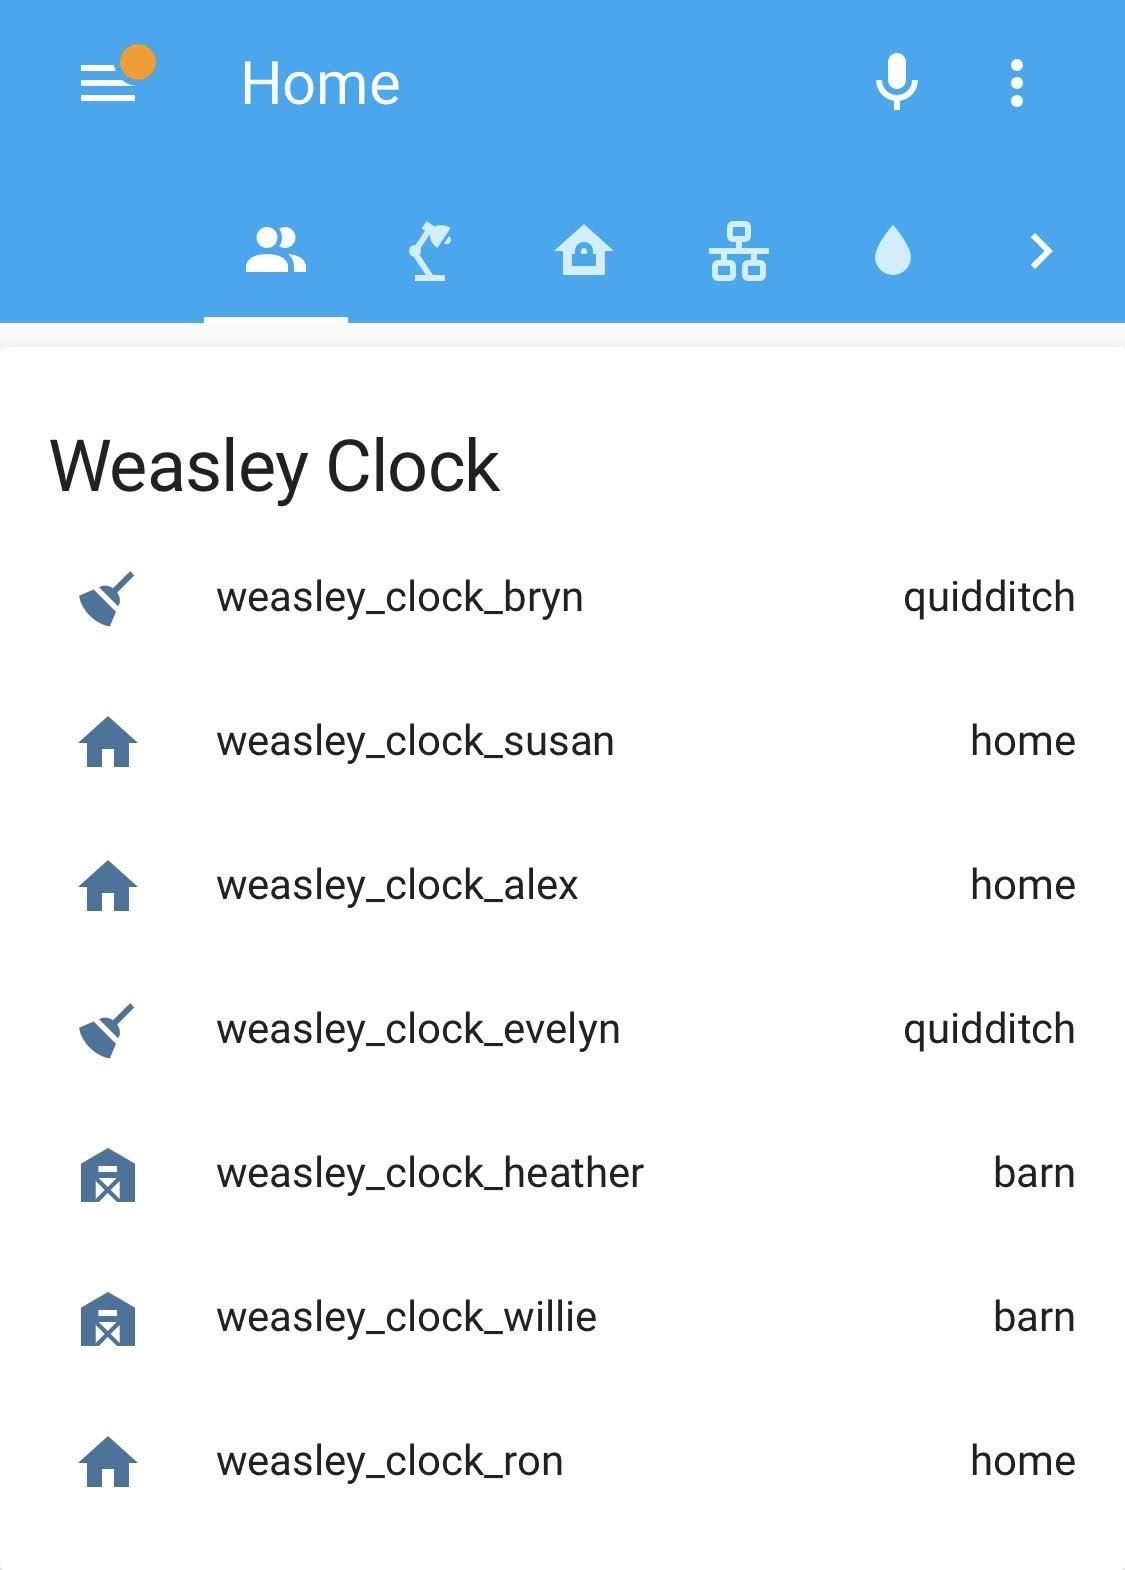 |
| Home Assistant dashboard. |
Once the Home Assistant rules were done, I had a dashboard view that had everyone's Weasley Clock state. Now I just needed to use this data to make clock hands move.
Home Assistant is an open source home automation project that prioritizes keeping control and data local. This is unlike most IoT and home automations systems that require connecting to the Internet and storing your data in the cloud.
Given that I had the clock states already computed on Home Assistant and a Raspberry Pi with the Servo controller in the clock itself, I needed a way to move that data from Home Assistant to the Weasley Clock. For this I chose the MQTT protocol, as it is popular for IoT and has extensive support in Home Assistant. I added automations to my Home Assistant to send MQTT messages whenever someone's clock state changed. For the receiving end, I wrote a Python daemon called weasleyclockd to listen to the MQTT event stream and move the servos accordingly.
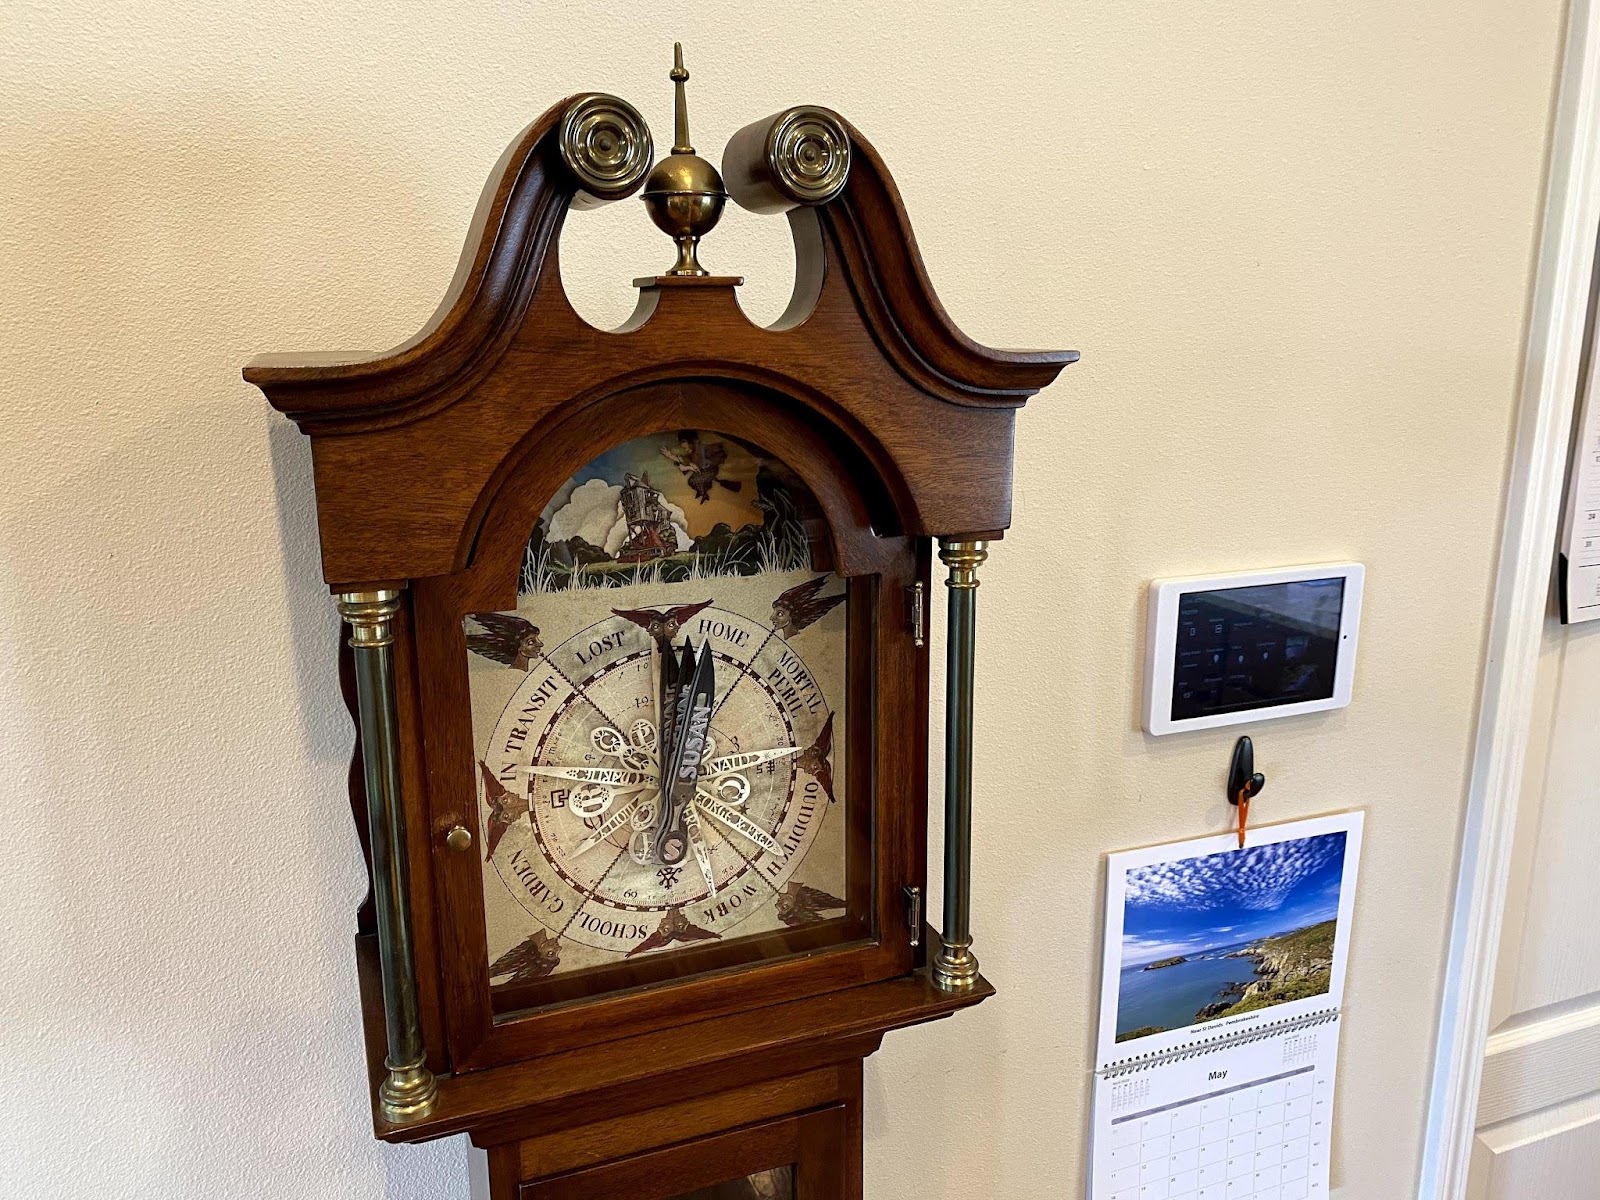
I added some flair to the hand placement to impart more information than just that someone was “Home” or “Lost.” For the sectors “Lost” and “In Transit” I made each hand’s position relative to how far from home the person was at the time. This way you can tell at a glance if someone is very close to home, at the nearby shop, or hundreds of miles away.
For readability, the clock hands are staggered so they don't all bunch up on segments like Home. The Home sector is logically divided into two sectors, one half for the main house and the other for our shop building.
An important feature is the artwork of the clock face. I found this beautiful poster print of the Weasley Clock by Minalima. Minalima is the source of much of the official artwork for the Harry Potter movies.
While constructing the clockworks, I was trying to figure out what to do about a case. I knew reusing an antique clock would be best. The only other option was to build my own enclosure but I do not have any fine woodworking experience. While doable, I knew I wouldn't be happy with my first effort. The mantle clocks I found in the local antique shops in Snohomish, WA were generally too small for the clockworks and the clock face artwork. Then I had a stroke of luck.
While traveling with my wife to Whidbey Island we wandered into the Good Cheer Thrift Store in Langley. They had a grandfather clock that looked to have the right size clock face and sufficient room for the clockworks. However I was totally unprepared to do clock shopping. First, I didn't have the measurements for my clock face or clockworks. Second, my wife, for whom this whole project was a surprise, was with me. So I took some mental notes and resolved that grandfather clock shopping was in my future.
Back home and armed with the needed dimensions, I started combing eBay for grandfather clocks. This wasn't going to be easy. First, working clocks are expensive. Second, no one ships grandfather clocks. Just when I'd find one that would suit my needs, it would invariably be in Florida for “pickup only.”
Fast forward three months and my wife and I decided to take the whole family on a trip to Whidbey Island. Back in Langley for lunch, I made a beeline for the thrift store. The grandfather clock was still there! It had even been marked down to $165. This was too good to pass up, so asking my wife to "not ask any questions, it's part of a surprise." I bought the clock and we loaded it into an already crowded Honda Odyssey van. She clearly knew something was up now.
Even more challenging than the clock body was figuring out how to make the clock hands. Top options in my mind were either 3D printing them or cutting them out of brass. I'm lucky to have two in-house experts to help me with the project. After seeing the amazing 3D printed hands by Pascal at Printable Props I decided on 3D printing. Our son, Alex, just completed his high school's Advanced CAD course, passing his Solidworks certification with a perfect score. I enlisted Alex to design the hands, and they turned out amazing. My father-in-law, Ron, did the 3D printing. He's been running the 3D printer for our FIRST robotics team and is our resident expert. To complete the look of the hands, I painted them with metallic paint and some flat black for contrast.
 |
| The family's daily movements. |
 |
| Demonstrating distance from home. |
I really wanted to be able to show off what the clock could do, but in the middle of a shelter-in-place order, no one was going very far from home. To solve that problem, I wrote a program that could play scripted sequences of MQTT messages. This way I could simulate events and make the clock hands move as if people were traveling.
 |
| Finished clock. |
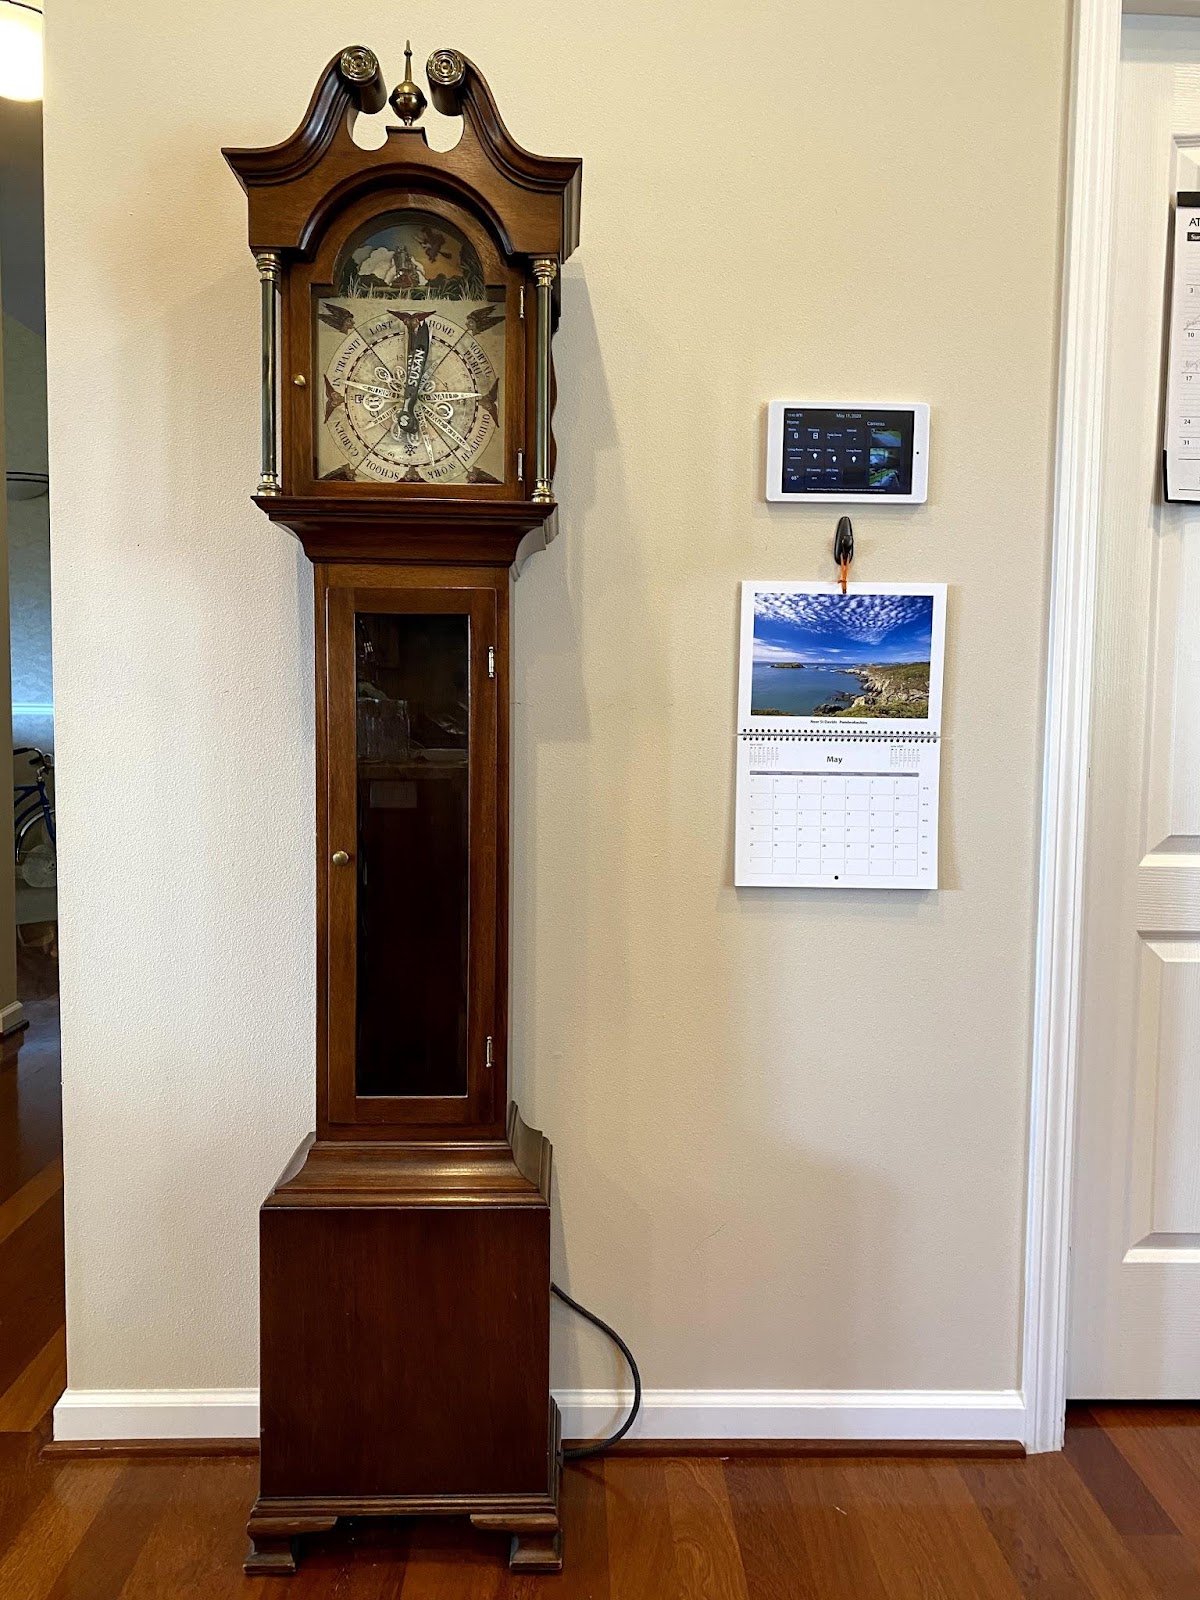 |
| Installed in the kitchen |
In the end I managed to keep the project a surprise. I did not make my Christmas deadline. I had to settle for unveiling the clock as a static display Christmas morning. I did manage to get it looking pretty. My wife was completely surprised and delighted!
It took another two months to get the final details sorted, including printing 3D parts, installing the clockwork, printing and painting the hands, and fine tuning the software.
While it feels done, I have more improvements I want to make. I'm planning to build a six or seven hand clock and to automate the clock chimes that came with the grandfather clock.
To paraphrase Arthur C. Clark: "Any sufficiently advanced IoT integration is indistinguishable from magic."
In a second generation Weasley Clock some things I’d to differently are:
- Design and 3D print gears that can clamp directly to brass rods,
- Use motors with encoders, and
- Possibly cut hands out of brass to make room for more hands.
Links to my build log, more photos, and the software I wrote:
- Weasley Clock Project on Github
- weasleyclockd, the software that runs the clock.
- Weasley Clock Chimes Project
- Photo album of the build.
- Build Log
- HackerNews Thread


Comments